What Are The 5 Steps In Pattern Making?

Pattern making is the art of manipulating a design onto a piece of fabric to incorporate a person’s figure. The ultimate goal is to create the perfect, customized fit. Therefore, the most important part of the garment development process is to draft the pattern based on the shape and proportions of the customer.
Pattern making creates a two-dimensional visual of the garment that is being designed. The pattern is made to fit the customer’s measurements and modified to add in specific styles and designs before eventually being draped and graded.
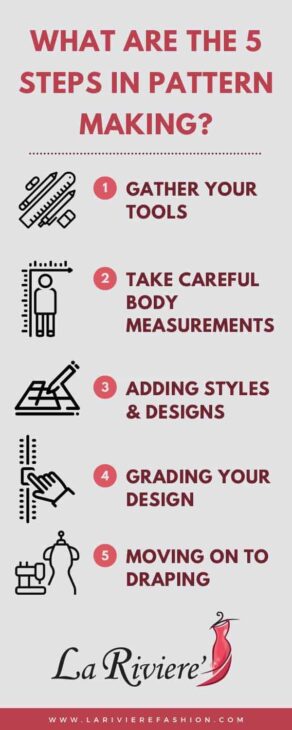
The pattern is the foundation of the entire garment; pattern making is part creativity and part methodology. It is a blueprint that guides where the fabric has to be cut to conform to the customer’s figure. While there are different methods of pattern making, the most common method is flat pattern making, and it can be accomplished in just five easy steps.
1. Gather Your Tools
There are a select few tools you will find in any pattern makers arsenal. As time goes by, pattern makers incorporate different tools into the drafting process; however, their staples remain the same.
If you’re new to pattern making or getting back into the art after a pause, here are a few tools you would need handy before getting started with the process:
- Pencils and Erasers: The first two things you will need when drafting a pattern is a pencil and an eraser. When drafting a pattern for the first time, you might find yourself referring back to your original designs and making changes to incorporate various styles or making a few tweaks here and there with sizing. That’s why even experienced pattern makers would avoid using non-erasable materials such as pens or markers when designing a new style.
- Patterning Paper: Patterning paper is graded paper, and it isn’t like any ordinary sketching paper or other illustration mediums. The paper is marked and graded to indicate lengths, inches, and sizes for easier drawing and better visualization of the draft. You could use ordinary paper and grade it on your own, but patterning paper is more time-saving and efficient.
- Two Straight, Clear, and Gridded Rulers: Straight, clear, and gridded rulers come in handy when measuring lengths, widths, and heights on your design. You would need two of them: one that is 6-8 inches long and another that is 12-15 inches long. The shorter scale is more appropriate for making precise measurements, and the longer scale comes in handy when making or measuring larger dimensions.
- Flexible Rulers: Flexible rulers are more versatile than straight rulers because they can be bent in different shapes and at varied angles to measure contours. An ideal flexible ruler should be 64 inches long or longer. This ruler is necessary for measuring curves and other non-straight parts of your pattern.
- Hip and Arm Styling Curve: A hip and arm styling curve is a curved, rigid ruler designed to trace out and measure angles and curves once the pattern has been sketched out with straight lines for more definition. The styling curve helps measure out areas in your pattern where you want more fullness, and it is essential if you want your finished garment to fit properly.
- Awls: Awls are necessary tools in any pattern makers toolkit. They’re essential for pivoting, scoring, and marking a design, which are all important aspects of shaping the design to the customer’s body.
2. Take Careful Body Measurements
Patterns are either custom-designed for individual clients or designed as general sizes for a larger consumer base. Flat pattern making requires pattern makers and designers to take accurate measurements of their model at multiple locations to get the perfect fit. They must also be mindful of how loose or tight a garment is supposed to be once it is finished.
The following body measurements are required in flat pattern making:
- Height: The customer should stand with their feet slightly apart and stable against a wall for measuring their height. You could alternatively have them stand beside a graded scale for more accurate measurements.
- Bust: Ask the customer to relax their arms and measure around the fullest part of the bust. It is important to understand that these initial measurements should be made as accurate as possible, whereas the final design has an inch or half an inch added to make the garment fit better.
- Waist: Measure between the customer’s ribcage and belly button, usually at the position of their elbows. This measurement is made loosely around the customer’s natural waist without tugging too much at their figure.
- Arm: Ask the customer to bend their hands at a 90-degree angle and place them on their hips. Measure from the center of the back of the neck down to the elbows and then down to the wrists with a flexible tape measure.
- Rise: Measure the length between the center back of the customer’s natural hips to their groin.
- In-seam: Measuring from the inside of the leg, measure the length from the customer’s groin to their ankles.
Some pattern makers divide measurements into vertical and horizontal measurements. Such measurements (arcs) are much more complicated as they only measure a quarter of the circumference as opposed to all of it. The logic behind measuring in increments is to get the perfect fit. However, the process is time-consuming and challenging to grasp for beginners.
(Source: Where And How To Take Body Measurements)
3. Adding Styles and Designs
The original pattern draft is made according to the customer’s body measurements and styles. Incorporating various styles into your design is what separates it from a generic design and turns it into a fashion statement. This may include adding flared sleeves, changing necklines, and so forth. Follow these 5 steps to find your style and you’ll have plenty of ideas to create you piece.
Pattern makers incorporate these styles and designs on top of their original sketch. However, when doing so, you must keep fit into consideration, as well as how flattering the finished design will look.
In this step, pattern-making software can be extremely useful, allowing you to draft personalized patterns to fit specific measurements .
4. Grading Your Design
Grading is the process of readjusting basic paper patterns to fit different sizes using the same original pattern template. In consumer markets where sizes have to be added or adjusted quickly, paper grading is used as a time-efficient method of creating multiple sizes by maximizing or minimizing one drafted template.
Patterning paper is often graded. You could just as easily trace the original design onto another piece of patterning paper to adjust the original design dimensions for other sizes.
5. Moving on To Draping
After you’re done drafting your pattern onto a piece of paper, you’ll need to change the two-dimensional image into a three-dimensional one to make final changes and to visualize how it will appear on a body compared to a flat surface. This is where draping comes in.
Once the pattern has been made, it can be traced out onto a piece of fabric and attached temporarily in place with needles. Draping refers to styling a customer (or more accurately covering them) with the cut-out fabric based on your drafted design.
At this point, you can visualize your design in three-dimension and make adjustments that suit your customer’s body contours and curvatures accordingly.
(Source: Clothing Industry)
Conclusion
To create a simple pattern, a pattern maker would have to follow five essential steps: gathering their material, taking proper measurements, adding styles and designs, grading their design, then draping it to result in the final garment. If you want to know more about pattern making and designs, you can learn pattern making online!
Pattern making has numerous benefits, such as time-efficiency, reusability, and customization. Patterns are particularly useful for customized designs or fast-fashion markets. Whether you are a self-employed seamstress or a mass-market clothing industry, pattern making is where your success begins.
(If you want some advice on styles and designs, La Riviere is a great place to find all you need to know about fashion!)


